Introduction
How do you go about writing your first application for Android or iOS? I had the same question and set about finding out.
Having briefly experimented with Android Studio back in the early 2010s, I knew I wanted everything to be as simple as possible, no fiddling about for hours with getting the correct tools installed, or tweaking configuration options, or at least in the beginning, learning a new programming language. It would also be good to write code only once for both Apple iOS and Android platforms.
The solution seemed to be Xamarin Form from Microsoft. It allows me to code in C# and can cross-compile for Apple iOS, Android and Windows. In this post I set out my exploration of Xamarin Forms, initially looking at Android only.
What is Xamarin Forms?
Nobody better to explain this than the Microsoft themselves: “Xamarin.Forms is an open-source UI framework. Xamarin.Forms allows developers to build Xamarin.Android, Xamarin.iOS, and Windows applications from a single shared codebase.
Xamarin.Forms allows developers to create user interfaces in XAML with code-behind in C#. These interfaces are rendered as performant native controls on each platform.”
Cost
Although Xamarin Forms is open-source, Visual Studio which I will use as an IDE, is not free in all use cases. I am using a free individual licence (“if you are an individual working on your own applications, either to sell or for any other purpose, you may use the software to develop and test those applications”), but a Business or Enterprise licence might be required depending on your situation.
Installation
Installation of Xamarin Forms is straight forward, the “Hello World” example from Microsoft covers the installation and setup as part of the tutorial.
If you already have Microsoft Visual Studio installed, you only need to run the Visual Studio Installer again and select “Mobile development with .NET” for installation.
Starting a new project in Visual Studio and selecting a Mobile App using Xamarin Forms will automatically ask to download the required Android SDK if it is not found on the PC.
Getting all the necessary bits installed are easy, but could take a while, just be patient. I have elected to setup both an Android emulator as well as a Samsung S10e for debugging purposes. The Samsung is used to test and debug on a real phone, while the emulator will be used when a mobile phone is not available.
As a side note, using the Android Emulator supplied with the installation has not been an option, it is extremely slow. Visual Studio recommends enabling Hyper-V to improve performance. Unfortunately this is only an option in Windows 10 Pro. It also seems that this option is better supported on Intel CPUs. I could not investigate this on my AMD as I do not have Windows 10 Pro.
Creating the first application
Creating a new application is as simple as launching Visual Studio 2019 and selecting “Create a new project” > “Mobile App (Xamarin.Forms)”.


After supplying your project name and project location, the next window allows you to choose a template for your app, Flyout, Tabbed or Blank, and to specify the platform, Android, iOS or Windows (UWP).

To get going, a good place to start is the Blank template. This creates an application with a single page, perfect to learn Xamarin. To change your application to be tabbed or with a flyout is easy and can be done later, or you can create a new applications and choose the relevant template.
If you have an Android phone connected (with Developer options available and with USB debugging enabled) you can now build and test your new application on your phone! Select your phone from the drop down and press play, as simple as that.

Obviously, the application does not consist of anything more than the blank template at this point.

XAML forms
How does it work?
To change the template to something more useful we need to understand the Xamarin Forms framework a little better. Looking at the Solution Explorer in Visual Studio we can get a glimpse of how everything fits together.

In the Solution Explorer we find a pair of XAML files which can be expanded to show a .cs file as a child. The page we saw on our phone earlier was created from this MainPage.xaml file. Opening MainPage.xaml (XAML = Extensible Application Markup Language) we can see the XML-based language that specifies what our application page looks like.

We can add additional text, labels, buttons or anything else we would like to add to our application page in the XAML file. The XAML only specifies what the application page looks like and cannot perform any actions. This is what the associate child C# .cs file is for.
Adding a button
If we want to add a button for instance, in MainPage.xaml we add the button with the following code:
<Button Text="Example button" Clicked="Button_Clicked" />
When the button is clicked the function “Button_Clicked” in MainPage.xaml.cs will be called:
private void Button_Clicked(object sender, EventArgs e)
        {
        }
At the moment this does nothing, but a quick update will change the colour of the button if it is pressed. To do this, in the XAML we add an identifier for the button:
<Button
            x:Name="TestButton"
            Text="Example button"
            Clicked="Button_Clicked" />
In the C# function we can now use the identifier to change the button’s colour:
private void Button_Clicked(object sender, EventArgs e)
        {
            TestButton.BackgroundColor = Color.Red;
        }
Main file
Apart from MainPage, the other file worth noting in the Solution Explorer is App.xaml. This can be considered as the parent file for the project. Opening App.xaml.cs we see the content is a new instance of the MainPage being created in the constructor.
public App()
        {
            InitializeComponent();
            MainPage = new MainPage();
        }
This file tends not to changed at all and in most cases can be left alone. If, however, we want to change our application to be Tabbed or make use of a flyout (as provided by the template options when creating a new application), we will need to return here and create a new AppShell instead of a new page.
Creating a decent looking interface
A large part of making a usable app is to ensure a good, clear and intuitive user interface. Xamarin uses XAML files to define what the interface looks like, and while this is easy to get started with, creating something looking good is not so straight forward. The Grailkit and the Essential UI kit for Xamarin provide professional looking templates to get you going at a cost. For a play around with apps I was not willing to spend any money and set out to create my own Xamarin form.
Hot reload
A key feature to help with XAML page creation added to Visual Studio in 2019 is XAML Hot Reload. Hot reload allows you to see changes made to a XAML file almost instantly on your phone. No need to recompile and upload a new copy of your application each time you make a change, just enable Hot Reload as described in the link and connect your phone via USB and run your program in Debug mode.
Templates
Starting with anything is so much easier if you have templates to work from. As mentioned, Grailkit etc exist, but if you are looking for free Xamarin.forms templates for any type of app page visit Snppts.
Colour palette
A quick note on design, a shortcut to getting something that looks decent is to decide on a colour palette and to stick with it throughout the App. A quick search provide many options. I have decided to use a blue palette called So Many Lost Songs.
What next?
Starting with a single page in your application, as described above, you can extend your application my adding more pages or more functionality using C# for each page.
In my first application I have moved from the single page view to a shell with a flyout. The flyout consists of shortcuts to specific pages, each with its own purpose.

So far Xamarin Forms have provided all of the framework I need for my applications. Any application you want to make that are based on pages can be made with Xamarin Forms. The only limitation I can currently think of is games. If I want to create a 3D, or even platform game, I am sure Unity will be better suited.
What next? Well, once you have created your Android application you can submit it to the Google Play store for everyone to use.
Getting your app on the Google Play store
As with getting going with Xamarin Forms and the Android SDK, Visual Studio makes it easy to get your app in the Google Play store. The process of signing your app and uploading it to the Google Play store with Visual Studio is covered in detail here: https://docs.microsoft.com/en-us/xamarin/android/deploy-test/publishing/publishing-to-google-play/?tabs=windows
In summary, to get your application ready for the Google Play store
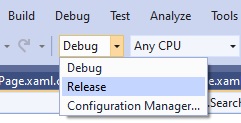
- Change from debug to release

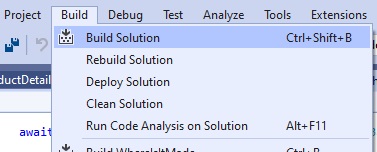
- Build solution

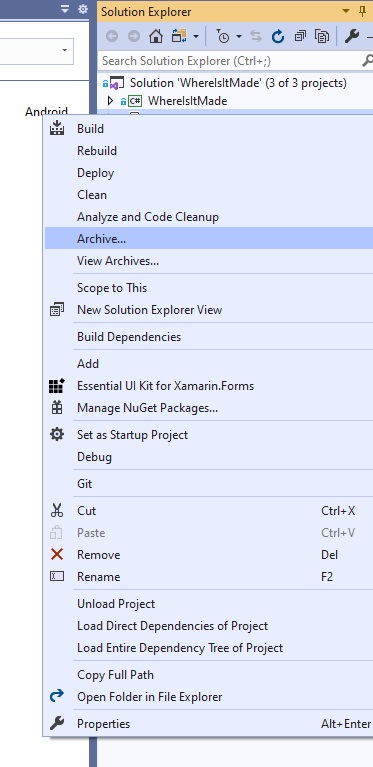
- In Solution Explorer, right click on the Android part of your project and select Archive

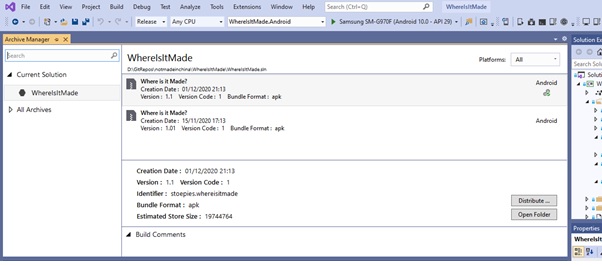
- Once the archive is available, select Distribute…

- The next page provides 2 options, either Ad Hoc or Google Play. Ad Hoc signs the APK and saves it locally for you to either distribute yourself or upload to Google Play manually. The Google Play option will upload the SDK to your Google Play developer account. The first time you submit a new app you have to do it manually.
Google Play
To add your application to the Google Play store you need a Google Play Developer Account. This will set you back $25. The Developer Account UI is straightforward to use. Once your application is ready, in the Developer Account interface, under All apps, select Create app. This will create a project in the Developer Account for your app. From here you can create a test release or production release of your application and upload the application itself. Once the application has been reviewed it is available to testers or the general public depending on your selected options.
Conclusion
Xamarin Forms has so far provided all the functionality I needed. I understand it is slightly slower than coding natively for either Android or iOS but the benefits of cross-compilation and using C# makes it worth it in my opinion.
If you already know C# (or C++ or almost any other programming language) using Xamarin Forms will be easy. Creating pages using XAML is easy and the learning curve is not to steep if you already have a good grip on HTML etc. The documentation provided by Microsoft is also clear and, in most cases, sufficient, although some of the pages are slightly out of date.
Lastly, if you want to have a look at my first application it can be found here: Where is it made?. The application, like most, use a database to store information and retrieve. For that we have you covered here: How to access a database from an App


