
As with many other complex problems, we can often solve and handle robotic problems more effectively if we break them up into smaller pieces. One way to achieve this is by using ROS (Robot Operating System), which promotes a more distributed design approach.
The basic idea is that we break the project up into smaller chunks called Nodes which interact by sending messages to each other. Nodes are then just programs that could all be running on a single device or distributed over multiple devices.
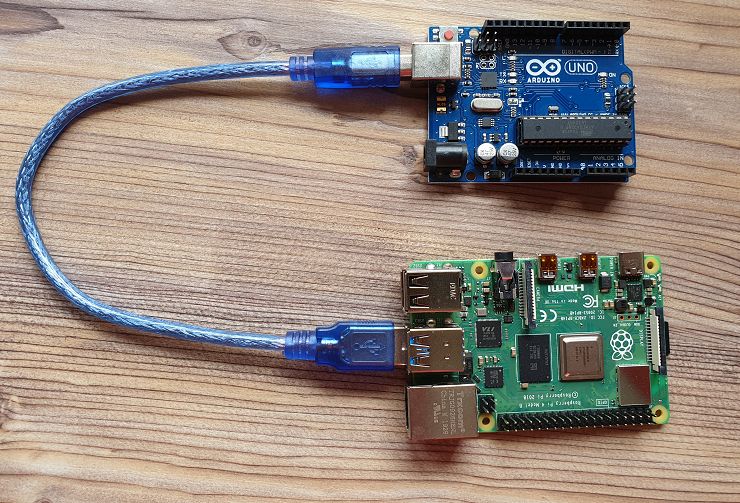
For example, you could have a Raspberry Pi running a node which reads a sensor then another node which gets the sensor data from the first node, process it and sends it to a third node which then drives some actuator. In this case all the nodes are running on the same hardware, but it could also be that one of the nodes is actually running on an Arduino which is connected to the Raspberry Pi.
So nodes are not limited to one hardware platform or even one language, for example some nodes can be programmed in Python while others can use C++. Using this approach it’s also easier to reuse or share Nodes with other projects or people. This is of course another benefit of using ROS, it has a large collection of libraries relevant to robotics made available to us.
In this post
We will take a closer look at ROS and go through the basics of how to get it up and running on a Raspberry Pi 3B. Then we will create some nodes on the Pi and also interface with a node running on an Arduino UNO.
Most of the work will be done from a Windows machine using a SSH terminal to connect to the Pi which runs Linux (Ubuntu). If you are using Linux, even better and you could of course also follow along using a terminal.
When to use ROS
It depends a lot on what your end goals are. If you just want to build RC car style robot which you drive around with an Arduino or Raspberry Pi using a Bluetooth module then maybe ROS is an overkill. But if your goal is to learn ROS then such a RC car style robot could be a very good starting point. If your goal is to build a robot arm that has multiple joints or a RC car with self driving capabilities or anything a bit more complex than just switching motors on or off then ROS could be for you. After reading this post you will know…
What is ROS
ROS is not an operating system in the same way that for example Ubuntu is an operating system. It is more of a framework designed to run on Unix based platforms that provides all the mechanisms and tools to create your robotics system. Coupled with that is an extensive library of nodes for tasks which are typically associated with robotic projects. This saves you from having to reinvent the wheel and allow you to focus on the real goals of your project.
As mentioned earlier one of its main features is the ability to have a network of distributed nodes which can communicate with each other. Communication is mostly realized through a publish and subscribe scheme. Data is transferred through Topics which you can imagine as the pipe through which specific data is moved. When a node wants to send data it would publish (send) a Message containing the data to a Topic. Any node that is interested in data from a Topic would subscribe to it and be notified (called back) when new Messages have arrived. You will often see this illustrated with a diagram like this:
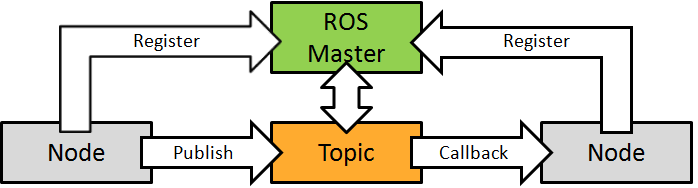
When ROS starts up it creates a master which is basically coordinating everything. When a new node is started it first registers with the master and provides details like its name and the topics with which it wants to interact.
In addition to publishing/subscribing through Topics where data flow is in one direction (from publisher to subscriber), ROS also allow the use of Services which are short transactions between nodes. However, in this article we will only look at exchanging data through Topics.
Setting up ROS
The first thing to do is get ROS installed on our Raspberry Pi. We will be using the slightly older Kinetic version of ROS which runs best on Ubuntu 16.04 and Debian Jessie. The installation instructions can be found on the ROS wiki. But since we don’t want to get stuck in the details of installing ROS I would recommend to rather flash this excellent image provided by Ubiquity Robotics to your SD card. The image has Ubuntu 16.04 and ROS Kinetic pre-installed together with some extra packages used by their Magni robot. This way you know that you start out with a good installation that has some basic package installed and runs properly.
You can use Etcher to flash the image to your SD card, insert it into your Pi and then follow the instructions on the Ubiquity Robotics site.
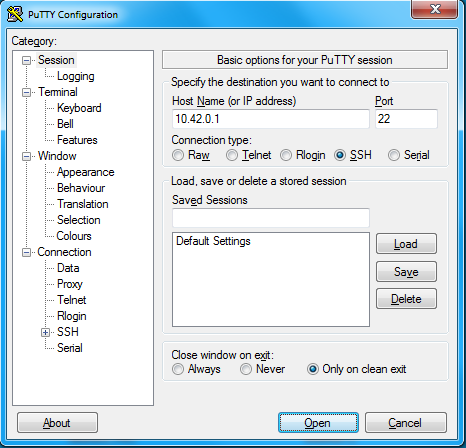
Basically what happens is that after starting up your Pi it will create an access point (SSID: “ubiquityrobot” followed by a number) to which you can then connect (password: robotseverywhere). Once connected use a SSH client like Putty to start a session, the IP is 10.42.0.1 with both user and password “ubuntu”.
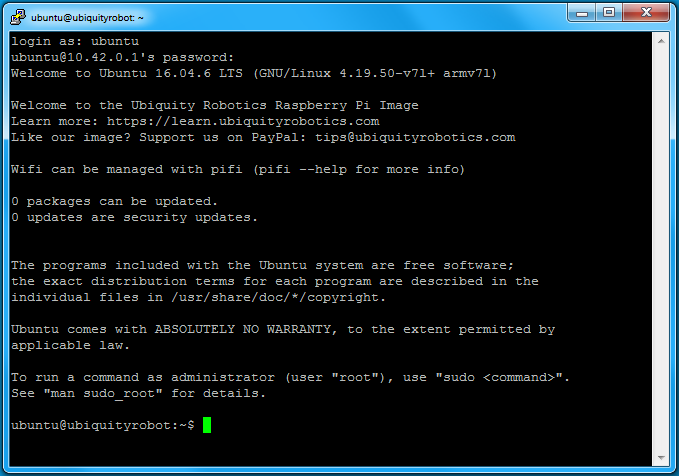
I will describe the rest of the setup using the SSH terminal but you could also connect a screen, keyboard and mouse to your Pi and configure it that way if you wanted (it even has a GUI). So once you are connected through the terminal you should see this output:
Setup Connection
Since we would later need to install some additional packages from the internet it makes sense to connect the Pi to your home network. Before we do this we can also personalize it a bit and give it a new hostname with:
sudo pifi set-hostname Robot
This sets the hostname to Robot, then we reboot to apply the changes:
sudo reboot
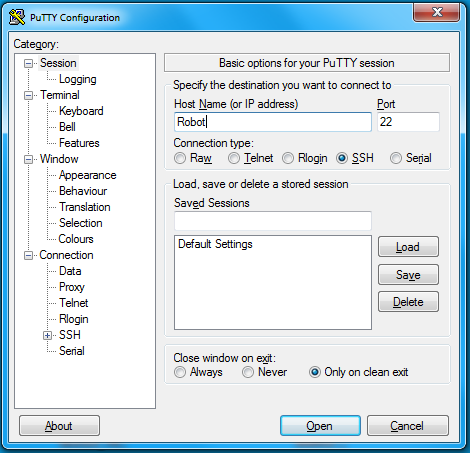
After the reboot connect to the access point, which will now have an SSID consisting of your new hostname followed by a number. Then start a new SSH session. To make sure the Pi can see your WiFi network use:
pifi list seen
(I have noticed that sometimes on a Pi4 you might not see any network although it is there, if this is the case just continue to the next step)
If you see your network then use the following to add it to your Pi:
sudo pifi add <MyNetworkSSID> <password>
where <MyNetworkSSID> is the SSID and <password> the password to log into your WiFi network. Once this is done, reboot again with:
sudo reboot
After this reboot the Pi should connect to your home network. Make sure the computer you are using is connected to the same network and then start a new SSH session. Since the Pi is now on your home network the previously used IP address would not work anymore so use the hostname (“Robot”) when making the SSH connection.
Disable Magni Support
Since the image is originally intended for the Ubiquity Robotics Magni robot, you could disable some additional software packages it uses with:
sudo systemctl disable magni-base
which then response with “Removed symlink /etc/systemd/system/multi-user.target.wants/magni-base.service.”
Install Samba
To make sharing of files between your computer and the Pi easier you can install Samba. Its not a requirement but I found it useful at times. To do it use:
sudo apt updatesudo apt install samba
Now create the directory which will be shared with:
mkdir /home/<username>/sambashare/
Next we need to tell samba about the new directory by editing smb.conf with Nano text editor:
sudo nano /etc/samba/smb.conf
add the lines below to the bottom of the file:
[sambashare]
comment = Samba on Ubuntu
path = /home/username/sambashare
read only = no
browsable = yes
Then press Ctrl-O to save and Ctrl-X to exit nano.
Restart Samba to allow the changes to take effect:
sudo service smbd restart
To allow Samba traffic through the firewall use:
sudo ufw allow samba
Samba doesn’t use the system account password so we need to set up a Samba password for our user account:
sudo smbpasswd -a username
You can now test if it works by opening Windows Explorer and typing “\\Robot\sambashare” as file path.
Catkin
Before we continue lets quickly look at Catkin. Catkin is the build system used by ROS and is based on CMake. So when we write new code for our ROS project, Catkin will be used to build the required libraries and executables to make it all run.
Since we used the Ubiquity Robotics image the Catkin workspace is already setup for us and you can navigate to it with:
cd ~/catkin_ws
if you list the directories in the workspace directory you should see at least “build”, “devel” and “src”.
![]()
The “src” directory contains the source code for all your packages. This is where you can write your own or extract/checkout/clone source code for the packages you want to build. Each directory within the “src” directory contains one or more catkin packages. In the root of the “src” directory you will also find “CMakeLists.txt” which is called by CMake and which we would take a look at again later.
The “build” directory is where the build system creates it’s intermediate files and normally there is not much for us to do in this directory.
The “devel” directory is where the output files like the executables are kept before they are installed.
Create a Package
As mentioned before, nodes are kept inside Packages so before we start creating our nodes we should create a package for them. We can create a package using the “catkin_create_pkg” script from the “src” directory of our catkin workspace. So first we make sure we are in the “src” directory with:
cd ~/catkin_ws/src
(tip: you can use tab to autocomplete)
Next we create the package and specify some dependencies that we already know it will have:
catkin_create_pkg mypackage std_msgs rospy roscpp
This will create a directory named “mypackage” which contains newly generated “package.xml” and “CMakeLists.txt” files. We also specified a dependency on the libraries “std_msgs”, “rospy” and “roscpp” which indicates that nodes in the package can use Python and C++. The “std_msgs” library gives us access to some primitive data types (byte, int, float, etc.) that we can use when publishing or subscribing to topics.
Now we need to build the package, so navigate to the root folder of the catkin workspace and use catkin_make like this:
cd ~/catkin_wscatkin_make
To add the workspace to your ROS environment you need to source the generated setup file:
source ~/catkin_ws/devel/setup.bash
Having created a package, we can now add a node to it. The code for the node should go into a “src” directory so we have to change to it.
cd ~/catkin_ws/src/myPackage/src
Create the first Node (C++)
Next we will create a node using C++ which is called “talker” and publishes messages to a topic called “chatter”. To create the source file you can use nano and type it all out. Another option could be to copy it from below and save it to “talker.cpp” in the shared Samba folder. Then copy it from the shared folder to your package “src” directory. If you are not too rushed then typing it out would be a good idea to get more familiar and more hands-on with the code, it’s anyway just a few short lines. Using nano you can get started with:
nano talker.cpp
Then type and save the program below (you can obviously skip the comments):
#include "ros/ros.h"
#include "std_msgs/String.h"

#include <sstream>

/**
 * This tutorial demonstrates simple sending of messages over the ROS system.
 */
int main(int argc, char **argv)
{
  /**
   * The ros::init() function needs to see argc and argv so that it can perform
   * any ROS arguments and name remapping that were provided at the command line.
   * For programmatic remappings you can use a different version of init() which takes
   * remappings directly, but for most command-line programs, passing argc and argv is
   * the easiest way to do it.  The third argument to init() is the name of the node.
   *
   * You must call one of the versions of ros::init() before using any other
   * part of the ROS system.
   */
  ros::init(argc, argv, "talker");

  /**
   * NodeHandle is the main access point to communications with the ROS system.
   * The first NodeHandle constructed will fully initialize this node, and the last
   * NodeHandle destructed will close down the node.
   */
  ros::NodeHandle n;

  /**
   * The advertise() function is how you tell ROS that you want to
   * publish on a given topic name. This invokes a call to the ROS
   * master node, which keeps a registry of who is publishing and who
   * is subscribing. After this advertise() call is made, the master
   * node will notify anyone who is trying to subscribe to this topic name,
   * and they will in turn negotiate a peer-to-peer connection with this
   * node.  advertise() returns a Publisher object which allows you to
   * publish messages on that topic through a call to publish().  Once
   * all copies of the returned Publisher object are destroyed, the topic
   * will be automatically unadvertised.
   *
   * The second parameter to advertise() is the size of the message queue
   * used for publishing messages.  If messages are published more quickly
   * than we can send them, the number here specifies how many messages to
   * buffer up before throwing some away.
   */
  ros::Publisher chatter_pub = n.advertise<std_msgs::String>("chatter", 1000);

  ros::Rate loop_rate(10);

  /**
   * A count of how many messages we have sent. This is used to create
   * a unique string for each message.
   */
  int count = 0;
  while (ros::ok())
  {
    /**
     * This is a message object. You stuff it with data, and then publish it.
     */
    std_msgs::String msg;

    std::stringstream ss;
    ss << "hello world " << count;
    msg.data = ss.str();

    ROS_INFO("%s", msg.data.c_str());

    /**
     * The publish() function is how you send messages. The parameter
     * is the message object. The type of this object must agree with the type
     * given as a template parameter to the advertise<>() call, as was done
     * in the constructor above.
     */
    chatter_pub.publish(msg);

    ros::spinOnce();

    loop_rate.sleep();
    ++count;
  }

  return 0;
}
As you can see the code is not complicated and well commented so it should be easy to see what’s going on. One line that is interesting and not commented is “ros::Rate loop_rate(10)”, what this line does is to create a Rate object to help with running loops at a fixed rate. How it works is that you would place the object inside some loop and call it’s “sleep” member function. The sleep will then delay the amount of time required to make sure the loop runs at the wanted rate even if some other calls in the loop took longer of shorter to execute. Pretty handy isn’t it! So in this case the object is called “loop_rate” and initialized to run at 10Hz, then some lines later you can see the “sleep” function being called in the while loop.
Another line that might not be so clear to understand is “ros::spinOnce()”. All that it does is to allow the node to service any callback functions. Since this node is only publishing we don’t expect to receive messages and therefore also don’t have any callbacks. Technically we don’t need it for this example but it’s good to get into the habit of using it.
The next thing to do is to build the node code. For doing this we first have to add some lines to the CMakeLists.txt file located in the root directory of your package. Navigate to this directory (should only be one level up) and open the file with nano:
nano CMakeLists.txt
Scroll to the bottom of the file and add these lines to it:
add_executable(talker src/talker.cpp)target_link_libraries(talker ${catkin_LIBRARIES})add_dependencies(talker mypackage_generate_messages_cpp)
So the first line, “add_executable(talker src/talker.cpp)”, adds an executable target called “talker” which is built from “talker.cpp” (if in the future you use more source files, you should also add them here separated by a space). The executable will be created in a directory with the same name as your package but inside the “devel” directory.
The second line, “target_link_libraries(talker ${catkin_LIBRARIES})” specify which libraries the executable target links against. Here you can just use “${catkin_LIBRARIES}” most of the time.
Then finaly the third line, “add_dependencies(talker mypackage_generate_messages_cpp)”. In this case it makes sure that the file/flag “mypackage_generate_messages_cpp” exist, which is again required to make sure that message headers are generated before building. Don’t worry if all these things does not make sense immediately, as you learn more things will slowly start fall into place.
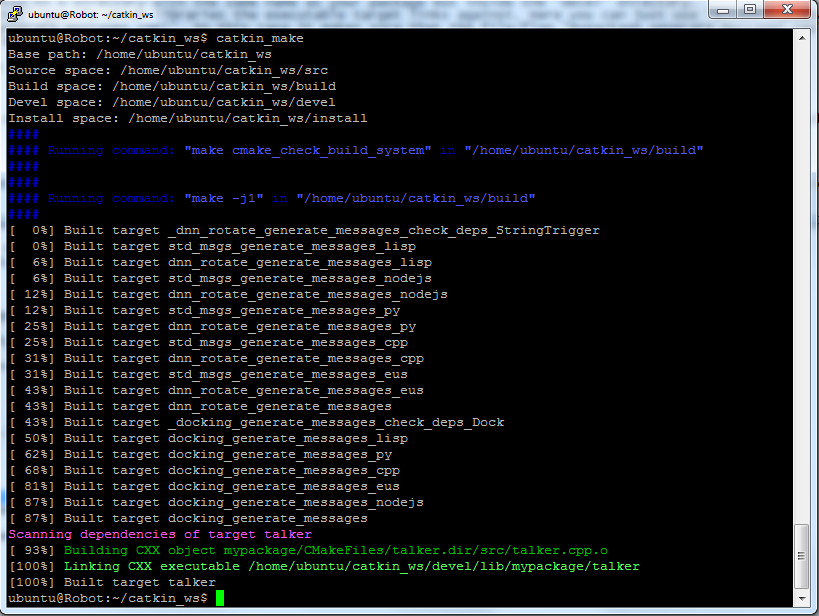
After you have added the lines to CMakeLists.txt you should save it and then build the node by first navigating to the catkin workspace and then calling catkin_make:cd ~/catkin_wscatkin_make
Have a close look at the output to make sure that the build was successful. It’s easy to make a typo somewhere in the code which could cause the build to fail. In such cases it would provide some additional information to help track the problem down. If it looks something like the image below then congratulations on building your first node!
Inspecting the node
Before we create additional nodes, lets experiment a bit with this one. Open another SSH terminal (in Putty you can right click on the window header and select “New Session”). In the new terminal you can display all the currently running nodes by using:
rosnode list
You should see a couple of nodes being listed but would not find our “talker” node among them. To see our node we have to run it first using “rosrun”. In the first terminal enter “rosrun” followed by our package name and node name, like this:
rosrun mypackage talker
The node should run and start writing out “hello world” messages to the terminal. If you now go to the second terminal and use “rosnode list” you should see that this time our talker node is listed.
You can also get information on the node by using:
rosnode info /talker
You should get the following output:
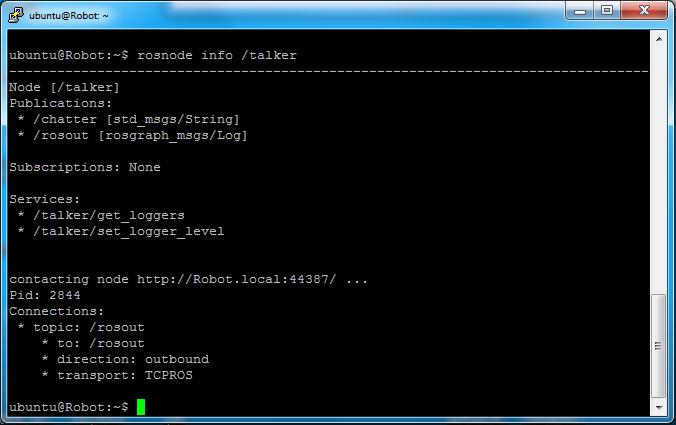
Here we can see that our node publishes to two topics, the “chatter” topic we created and also to “rosout” (which is the output to the terminal) and has no subscriptions. We can do the same for the “chatter” topic by using:
rostopic info /chatter
Which gives the following output:
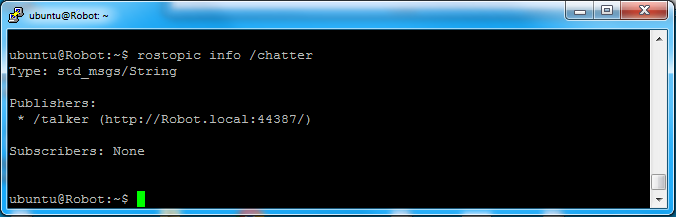
Here we can see that the “chatter” topic uses messages of type std_msgs/String and has only one publisher node called “talker” and for the moment no subscribers. We can also list all the available messages and get more information about them with “rosmsg list” and “rosmsg info std_msgs/String” (for info on the std_msgs/String message).
Another way that we can make sure that the “talker” node is really publishing messages is to use the “echo” rostopic command which will display the messages which is published to a topic. So if we want to display the messages which is published to the “chatter” topic we can use it like this:
rostopic echo /chatter
These are some very handy commands that we can use to get more information on nodes, topics and messages. Before we move on, you can stop the “talker” node (running in our first terminal by pressing Ctrl+C). The same might be needed to stop the rostopic echo command in the 2nd terminal if you tried it out.
Create a second Node (Python)
Now we need a node that subscribes to the “chatter” topic and gets notified when new messages are being published to it. To make it interesting we will use Python to create the node this time. So like with the previous node you can create the source file with:
nano ~/catkin_ws/src/mypackage/src/listener.py
And then type out the code below and save the file:
#!/usr/bin/env python
import rospy
from std_msgs.msg import String

def callback(data):
    rospy.loginfo(rospy.get_caller_id() + "I heard %s", data.data)

def listener():

    # In ROS, nodes are uniquely named. If two nodes with the same
    # name are launched, the previous one is kicked off. The
    # anonymous=True flag means that rospy will choose a unique
    # name for our 'listener' node so that multiple listeners can
    # run simultaneously.
    rospy.init_node('listener', anonymous=True)

    rospy.Subscriber("chatter", String, callback)

    # spin() simply keeps python from exiting until this node is stopped
    rospy.spin()

if __name__ == '__main__':
    listener()
Disclaimer: The two previous example comes from the ROS tutorials where you can also find some more detailed explanations on it.
In this program we create a callback function also named “callback” which will be called each time the node receives a message on the “chatter” topic. The first argument of this function contains the data of the message that was received. The function itself then just prints out the message data to the terminal. The main part of the program is created in the “listener” function where we first create the node instance and then subscribe to the “chatter” topic. After that the node goes into a loop and whenever it is notified of a new message it calls the callback function.
Before we can run the node we need to make the file executable with:
chmod +x ~/catkin_ws/src/mypackage/src/listener.py
Like with the previous node we need to add some lines to the end of CMakeLists.txt, so use nano to add the following lines:
nano ~/catkin_ws/src/mypackage/CMakeLists.txt
catkin_install_python(PROGRAMS src/listener.pyDESTINATION ${CATKIN_PACKAGE_BIN_DESTINATION})
So now the next step is to build the node. First navigate to the catkin workspace and the run “catkin_make”:
cd ~/catkin_wscatkin_make
Check the output from the build to make sure it completed successfully.
Running both nodes
If all looks good after running catkin_make then use the second terminal to run the node with:
rosrun mypackage listener.py
To make sure it is running we can use “rosnode list” on the first terminal and should then find the “listener” node (with some random numbers at the end). We can now make a quick test by using the rostopic pub command to publish a message to the “chatter” topic which should then be displayed by the listener node in our second terminal. To use this command we have to specify the topic to which we want to publish as well as the message type and the message like this:
rostopic pub /chatter std_msgs/String "hello from the rostopic pub"
If the listener node displays our “hello from the rostopic pub” message then we know it’s working and we can run our previously created “talker” node again with:
rosrun mypackage talker
The result should be the talker node publishing the “hello world” messages which are received by the listener node which confirms it by writing to the terminal “I heard hello world”, something like this:
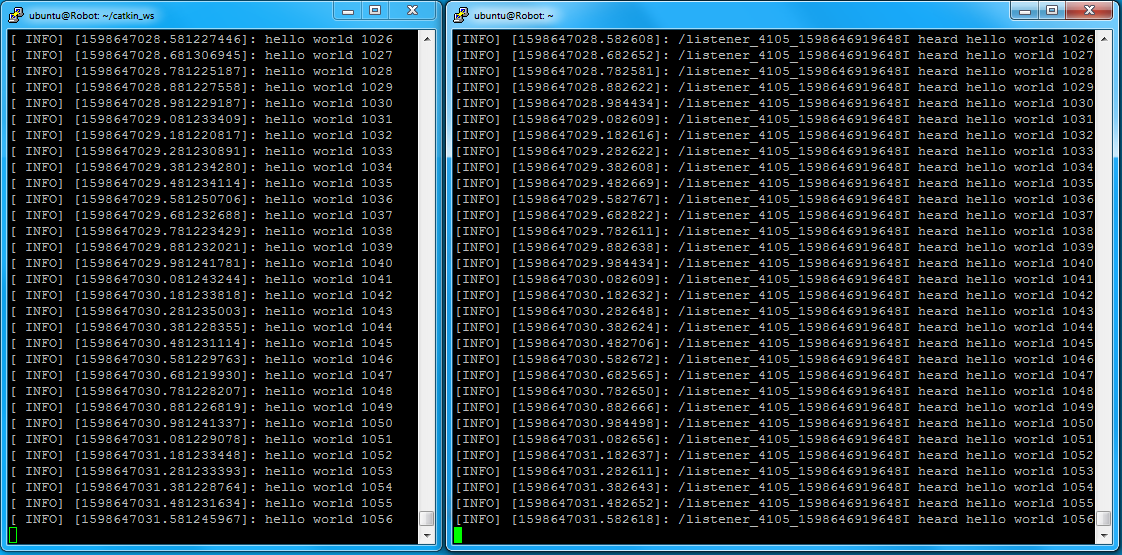
If you get this output then congratulations! You have just created two nodes in different programming languages which can communicate with each other! From here it just gets more interesting!
Create an Arduino Node
Okay so now we move to the part where we program a ROS node for our Arduino UNO. So what we will do is to replace the “talker” node we made earlier with a node that does the same (publish “hello world” messages to the “chatter” topic) but runs on the Arduino UNO.
Communication between ROS nodes typically happen over TCP or UDP, but since this is not an option when working with a normal Arduino UNO we need another way for them to communicate. The solution to this is to connect the Pi and Arduino through their serial ports.
For this to work we need to install the rosserial package on our Pi and also the rosserial library on the computer that we will use to program the Arduino UNO with. Lets start with the Pi, so to install rosserial enter the following in your SSH terminal:
sudo apt-get updatesudo apt-get upgradesudo apt-get install ros-kinetic-rosserial
That’s it for the Pi now for the Arduino. So start up your Arduino IDE and go to Sketch -> Include Library -> Manage Libraries…
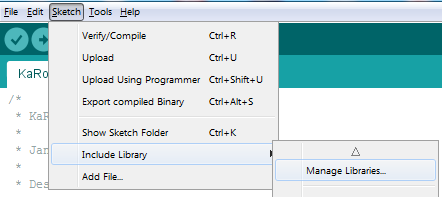
Then in the search box type “rosserial” and install this library.

When it’s done it’s normally a good idea to just quickly restart the IDE. Then create a new sketch and copy the code below to it:
#include <ros.h>
#include <std_msgs/String.h>

/*
 * Creates a handle to our ROS node
 */
ros::NodeHandle  nh;

std_msgs::String str_msg;

/*
 * Create a publisher which publish on the topic "chatter"
 */
ros::Publisher chatter("chatter", &str_msg);

char hello[12] = "hello world";

void setup()
{
  /*
   * Initialize the node and advertise what we will be publishing
   */
  nh.initNode();
  nh.advertise(chatter);
}

void loop()
{
  str_msg.data = hello;
  /*
   * Publish the message
  */
  chatter.publish(&str_msg);

  nh.spinOnce();
  delay(1000);
}
If you look through the code you will see it’s again very easy to understand and somewhat similar to the previous C++ “talker” node we created. So next save the sketch and upload it to your Arduino UNO. When it’s done, plug the Uno into one of the USB ports of your Pi and use the following command:
dmesg | grep tty
In the list that appears look for “ttyACM0” or “ttyUSB0” which would normally be the port connected to the Arduino. Now we need to run rosserial on the Pi with:
rosrun rosserial_python serial_node.py /dev/ttyACM0
The output should look something like this:

If you get this then the connection to with the Arduino should be fine, we can double check it by using the second terminal and listing the available topics with:
rostopic list
You should be able to see the “chatter” topic which is created by the Arduino node and to which it is publishing. We can also run out listener node again to output the messages sent from the Arduino with:
rosrun mypackage listener.py
If all went well you should see “I heard hello world” being printed out. Pretty cool isn’t it!
Now that you have the seen the basics and have a working example you should definately check out the rosserial_arduino tutorials.
Creating a launch file
In the above examples we only had one or two nodes that we ran by manually starting them. But since ROS encourages distributed design you will soon find that you have a fair amount of nodes to start which can become quite tricky. Some nodes might need to start before others or you might forget which nodes are needed for a specific solution. To solve this problem we can create what is called launch files.
These are XML files with a .launch extension which you can create to start multiple nodes in one call. Typically launch files are stored in a launch directory inside your package directory but it could also just be inside package directory. So let’s create one, first create a “launch” directory and then navigate to it:
mkdir ~/catkin_ws/src/myPackage/launchcd ~/catkin_ws/src/myPackage
Then we use nano to create the launch file:
nano ~/catkin_ws/src/myPackage/launch/mylaunch.launch
Now type the XML file contents below and save the file when done:
<launch>
	<node pkg="rosserial_python" type= "serial_node.py" name="serial_node1">
		<param name="port" value="/dev/ttyACM0"/>
	</node>

	<node pkg="mypackage" type="listener.py" name="listener1"/>
</launch>
So here we specify two nodes that we want to run, the “serial_node” node from the “rosserial_python” package and the “listener” node from “mypackage” package.
The layout is pretty straight forward, we have open and closing launch tags with nested node tags. In the node tags we provide the package and node type and then also an instance name for the node.
To properly start the “serial_node” we need to pass it the port to which it needs to connect which is done in the param tag. Now to run the launch file we use roslaunch and provide the package and launch file name like this:
roslaunch mypackage mylaunch.launch
What’s next
We have covered a lot in this post, from briefly trying to explain what ROS is, how it works and how to create simple nodes in both C++ and Python. Then we also looked at how to run nodes and inspect them with some basic command line tools. Finally we looked at how we can create a node that runs on an Arduino and can interact with a node on our Raspberry Pi. This should be a good starting point for you to work from for further exploring the world of ROS!
ROS also provides some GUI tools to help visualize how your nodes are interacting but can be tricky to setup on a Windows environment. Although you can get a lot done using Windows and Putty it would definitely be easier if you had a Linux machine or virtual machine that you could use. One of these GUI tools is called “rqt_graph” which can be used to give you a visual overview of the nodes used in your robot. I used an Ubuntu machine (VM running on Windows), ssh to the Raspberry Pi and launched our previously created launch file. Then I used a separate terminal to run “rqt_graph” and got the following output:
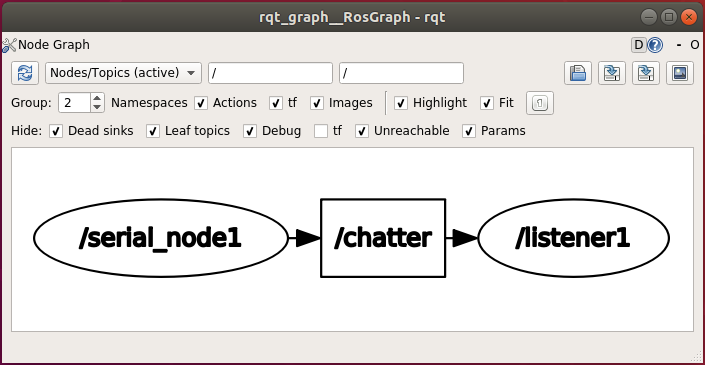
How nice is this, now we can clearly see our two nodes connected through the “chatter” topic.
Something else that you might also want to take a look at next is ROS services. Up to now we have used Topics to exchange data by publishing or subscribing to them. This works well when you have for example a constant stream of data, but what if you just want to perform some once off tasks. For example to query the state of your robot where you request some specific data and wait for a response. This is where ROS services comes into play.
Summary of basic ROS commands
The table below can be used as a quick reference table for some of the basic ROS commands we used.
| Task to perform | Command |
| Nodes | |
| List all active nodes | rosnode list |
| Info regarding a node | rosnode info <node_name> |
| Topics | |
| List all active topics | rostopic list |
| Info regarding a topic | rostopic info <topic_name> |
| Messages | |
| List all active messages | rosmsg list |
| Info regarding a message | rosmsg info <full_msg_name> |
| Publish a message | rostopic pub <topic_name> <full_msg_name> <message> |
| Display messages from a topic | rostopic echo <topic_name> |
| Packages | |
| Create a new package | catkin_create_pkg <package_name> <dependencies…> |
| Build packages | catkin_make |
| Starting ROS* | roscore |
*On our installation it’s automatically started when the Pi boots up
The end
So this then brings us to the end of this post and I hope you also found it interesting and helpful for your future projects! Hopefully I can find the time to write some follow-up posts to talk more about this very exciting technology.
One thought on “First steps with ROS”